 Transformer Help
 Transformer Help
Transformer is a somewhat specialized utility for doing complex transformation operations on multiple Unicode text files.
Transformer loads Unicode files (UTF-8 or UTF-16) and performs sequences of search-and-replace or script transformation operations on them. It provides you with an interface to create and test these sequences of operations before running them in batch mode on a set of files.
We wrote version 1 of Transformer to assist in the rescue of textual data from obsolete file formats such as DOS word-processor files. Sometimes, it proves impossible to rescue old data through normal means such as running the original application and exporting to a format which can be imported by a more modern program. Perhaps the program which created the data no longer exists or cannot be run on available hardware, or perhaps it cannot save to any format but its own. In these circumstances, it is often necessary to rescue the data by a process of manual conversion, identifying blocks of text or other data in the original file which can be replaced with Unicode characters, and building sequences of replacement operations which gradually convert the data. This often requires an exhaustive trial-and-error approach in which replace operations are added incrementally and tested in various sequences before a reliable sequence is developed; then the sequence can be run on a group of files. Transformer should provide as efficient a working environment as possible, with very fast completion time for replace operations, so that the user can focus on the task itself rather than the machinery.
After completing version 1, we began to use Transformer on more complex and varied projects, and determined that it would benefit greatly from being able to do more than simple search-and-replace. Version 2 of Transformer therefore includes a scripting capability, using ECMAScript, A.K.A. JavaScript. This functionality is based on the excellent Mozilla SpiderMonkey JavaScript engine, which is bundled with Transformer as a dynamic link library. The source text is supplied in the form of a JavaScript string variable, which you can modify using script code; then you return the result in the form of another JavaScript string variable.
Transformer is distributed as a self-extracting installer setup_transformer_XXXX.exe, where XXXX represents the version number. To install the program, simply run the file by double-clicking it. The installer gives you the option of installing all the program source code; you would only want to do this if you are a Delphi programmer thinking about contributing to the project.
To uninstall Transformer, use the Windows Add/Remove Programs Control Panel applet.
To upgrade to a newer version of the program, we recommend uninstalling your previous version before installing the newer version.
Version 2.0.0.0 introduces the following changes:
Version 1.1.2.0 introduces the following changes:
The following changes were introduced between version 1.1.0.6 and version 1.1.0.8:
The main screen is divided into three areas, the Sequence area, the Source text area, and the Output text area.
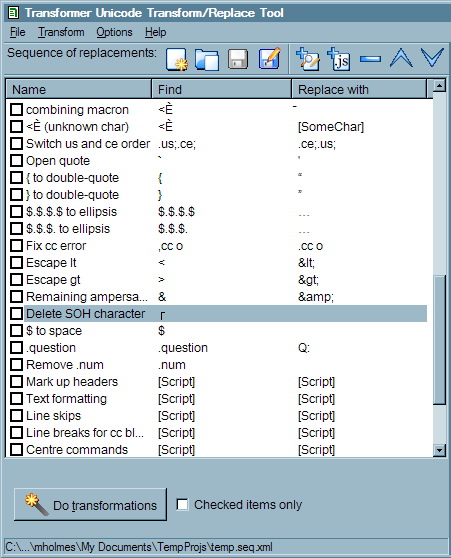
The main menus in this screen give you access to all the commands available. Each area of the screen has its own custom toolbar containing a small subset of these commands.
These buttons allow you to create, load and save sequence files. Sequence files are collections of search/replace and script operations, stored in XML format.
These toolbar buttons allow you to add new search/replace or script operations, delete selected operations, and move operations up and down in the sequence. When you add or edit an operation, the program will show the Replace pair dialog box (for a search/replace operation), or the Script item dialog box (for a JavaScript operation).
You can click on the header elements in this listbox in order to sort the operations alphabetically, based on the header. For instance, if you click on the Name header, the sequence will be sorted based on the name you have assigned to each operation. Be careful with this feature; the sequence in which transformation operations are done is often critical to the success of the overall operation, so it may be important to maintain a working sequence.
You can also drag items around in the sequence to re-order them, or use the up/down arrow buttons to move them.
JavaScript operations have only "[Script]" in both the Find and Replace with columns, so they should always sort together when you click on these column headers.
Each item in the listbox represents one search/replace or JavaScript operation. A replacement operation has a name (an arbitrary description you give it, for your own purposes), a "Find" string, a "Replace with" string, and a checkbox representing whether the item is "turned on" or not. Script operations also have a name and checkbox, but they all have "[Script]" in the other two columns, because the operation of a script is not predictable. If the Checked items only checkbox at the bottom of the screen is checked, then items in the list which are not checked will be ignored when the sequence is run.
When you click on this button, the sequence of operations listed above will be run against the source text in the source text box on the right, and the results will be placed in the output text box.
If you want to restrict the transformation operations which are run when you press the Do transformations button, you can check this checkbox, and then click the checkbox next to each of the operations you want to run. Unchecked operations will then be ignored.
The path to the current sequence file is shown in the status bar.
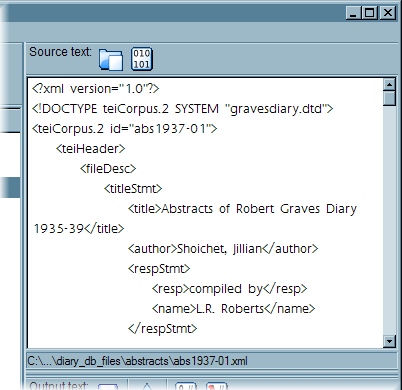
The Source Text toolbar buttons provide only two functions, both for loading files. The first allows you to load a text file from disk, and the second will load a binary file. In most cases, you should use the first option, but you may occasionally need to do search-and-replace on a binary file. When binary files are loaded, problem bytes such as control characters are converted into human-readable numeric representations; for instance, a byte with a value of 11, which represents a vertical tab, is converted to . Of course, once you convert a binary file in this way, it cannot function as a binary file any more; it is essentially a text file.
The location of the current source text file is shown in the small status bar below the source text display.
The source text is displayed in the text area at the top right of the main screen. You can edit the source text here, with no risk of overwriting the original file, because there is no mechanism for saving changes.
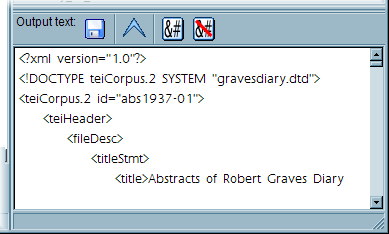
This toolbar button allows you to save the output of your transformation operations to a file.
If you click on the up-arrow button in the output text toolbar, the contents of the output text box below it will be copied into the source text area above, thus becoming the source for any future replacement operations.
Although Transformer is fully Unicode-capable, it is sometimes useful to be able to convert non-ascii characters into their hexadecimal escape characters so that they can be processed by non-Unicode systems. Pressing the first button will escape any character above #127 to a hexadecimal escape sequence, and pressing the second button will convert numerical escapes back to Unicode characters.
The results of your transformation sequence will be shown in the output text area. You can save these results using the Save toolbar button above it, or the corresponding items on the File menu
Once you have saved the output to a file, the path to the file will appear in the status bar below the output text box.
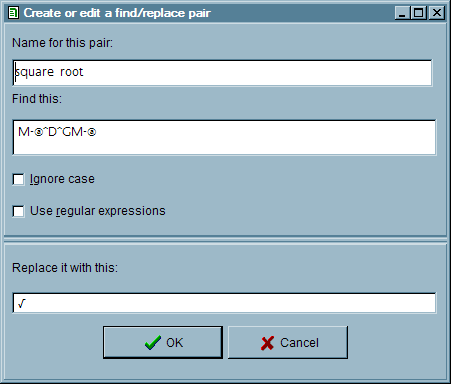
Each "replace pair" in your sequence can be given a distinct name to help you remember exactly what it does. You can enter anything you like for the name.
In this text box, enter the sequence of characters you would like to replace.
If you want to replace both upper- and lower-case versions of your text, check this checkbox.
If you know PERL regular expressions, you can enter a search string which uses them, and check this checkbox. Please note that the open-source regular expression engine used by Transformer is a fairly primitive library (TURESearch, part of the JEDI Code Library) and does not support all PERL regexp syntax.
Type or paste the replacement text you want to use into this text box.
Pressing OK will save the details of your find/replace pair; if you press Cancel, the previous settings for this pair will remain unchanged.
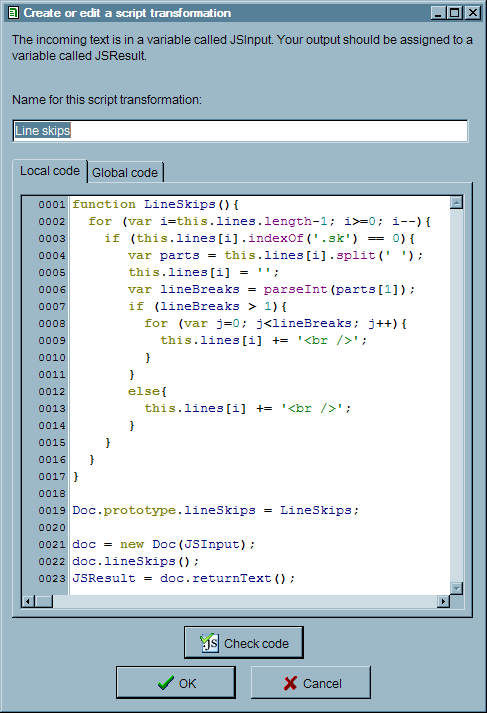
Each replace pair or script item in your transformation sequence can be given a distinct name to help you remember exactly what it does. You can enter anything you like for the name.
This is where you type your JavaScript code. The editor uses syntax highlighting and has line numbering to help you edit the code. The instructions at the top are important: the source text arrives in a string variable called JSInput, and you store your transformed version of it in a second variable called JSResult. You can check your code for syntax errors using the Check code button; the JavaScript engine will try to compile your code, and give you feedback on any errors it finds, with line numbers where appropriate.
Pressing OK will save the script; if you press Cancel, the previous settings for this script will remain unchanged. Before saving, the program will syntax-check the JavaScript, and give you an error message if it finds a problem. You cannot save script code which has syntax errors.
You can check your code for syntax errors using the Check code button; the JavaScript engine will try to compile your code, and give you feedback on any errors it finds, with line numbers where appropriate.
The Local code tab shows the code editor containing JavaScript which is local only to this script operation. In simple operations, this will be all you need. However, on a more complex project, you may want to store functions, classes etc. which you can re-use in multiple script operations. If you click on the Global code tab, you'll see another code editor. Any code written in this editor is global to the project, meaning that it's always available for any individual script operation to use. Global code is also left in place when you create a new sequence; more often than not, you'll want to re-use at least some global script code across projects.
Pay careful attention to the instructions here. When the script operation runs, the contents of the source text are provided to it as a string variable called JSInput. Your script code should operate on this variable to perform whatever transformation it needs to do. When your operations are complete, you should store the results in a variable called JSResult. The program will take the contents of this variable and feed them to the next operation in the sequence.
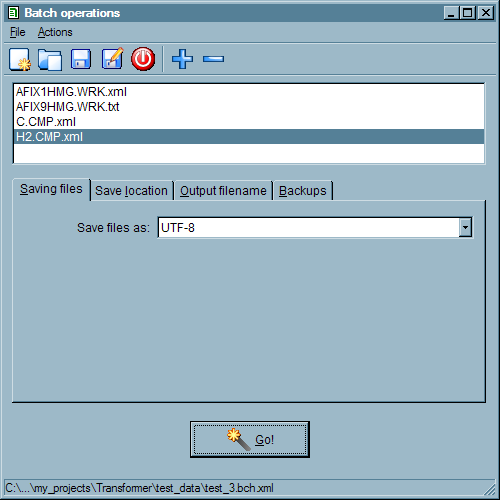
The Batch Processing screen allows you to apply the replacement sequence which is open in the main screen to a list of files (a "batch") all in one operation, saving the results to disk. The top half of the screen shows the list of files which will be changed. You can add or remove files from the list using the plus and minus buttons on the toolbar.
At the bottom of the screen is a tabbed interface where you can choose settings for your operation. The first tab, Saving files, allows you to choose an output encoding for the files that will be saved. The second, Save location, lets you choose where to save the new files. In the third tab, Output filename, you can establish a pattern for naming the new files, based on the original filenames. If you simply want to overwrite the original files, you can choose to save in the same location and with the original filename; however, using a different location and/or filename allows you to preserve the original files in case something goes wrong. You can also guard against problems by setting a backup location in the Backup tab.
After choosing a list of files and setting your preferences, press the Go! button to start the batch operation. The program will show its progress as it works through the files, and report back at the end of the process with details of how many files were changed, and how many replacements were made.
If you are going to make use of the same batch operation regularly, you may want to save it as a file. You can do this using the commands on the File menu or the equivalent toolbar buttons.
Transformer works only with Unicode text; when a file is loaded, it will be turned into a stream of 16-bit characters internally (32-bit Unicode is not supported at this point). When loading a file, this is how the program decides what to do:
UTF-8 files without Byte Order Marks are common, because some systems and applications cannot handle byte-order marks. If you know your files are UTF-8, but they don't have BOMs, then you can add a BOM to them in the following way:
All your files will have a UTF-8 BOM added to them, so the program will definitely understand how to read them. You can remove BOMs from UTF-8 files in a similar way, by pressing Control + Alt + C.
When you do batch transformations or save files from the Output Text box, you have the option of adding BOMs to your UTF-8 files or not. Whether you do so is up to you, and depends on what you're going to do with the files later. If you know you will NOT be using the files in contexts where the BOM will cause problems, then it's recommended that you add a BOM.
If you want to use Transformer on ASCII files, and get ASCII files as output, then simply choose to save them as UTF-8 without a BOM. The first 127 characters in UTF-8 are saved as single-byte characters, and are the same as the ASCII set, so an ASCII file containing only these characters is identical to the same file in UTF-8 without a BOM. If you want to work on ANSI files, and keep them in ANSI format, then Transformer is not the right tool for the job.
You have one final option when saving files: ASCII with numeric entities. This saves files in ASCII format, by converting each character with a codepoint above 127 into a numeric entity (such as é for codepoint 233, the e-acute). This preserves the values of Unicode characters, and if the file format is HTML or XML, then they will remain accessible because numeric entities are supported in these formats.
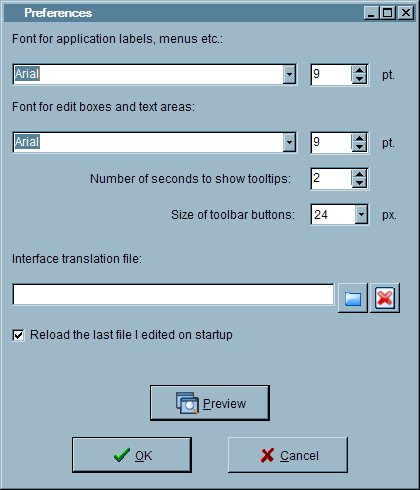
The Preferences dialog box enables you to control the environment of the program. You can set the fonts for two different types of element:
You can also choose the length of time for which tooltip hints are displayed, in seconds (set this to zero to turn off tooltips completely), and you can choose between four different sizes for the button images displayed on the application's toolbars. Finally, you can load an interface file to change the entire interface of the program to another language.
Once you have selected your preferences, you can press the Preview button to test out your choices. The interface of the program will be changed according to your selections, but if you decide that you don't like the result, you can simply press the Cancel button to undo the changes.
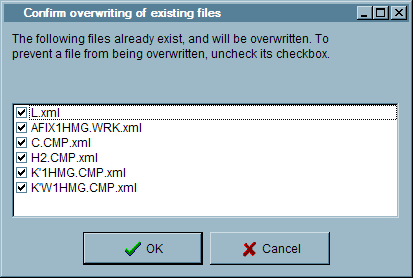
The file overwrite confirmation dialog box should appear whenever you are about to do an operation which involves saving multiple files, where some of those files already exist. Normally, when you save a file to disk, if the file already exists you will see a simple dialog box which asks you whether you want to overwrite it or not. When the operation involves multiple files, a more complex dialog box is needed.
When the dialog appears, it will show all of the files you're about to overwrite in a list, with each one checked. If for some reason you don't want to overwrite a particular file, just uncheck it in the list. Then you can press OK to continue with the operation. If you want to cancel the operation completely, press Cancel.
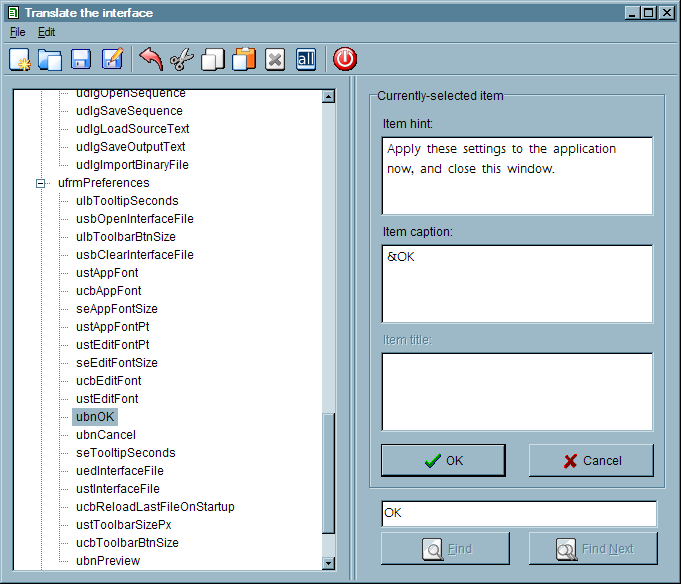
The File and Edit menus give access to the same functions which are available from the toolbar.
Using the file commands on the toolbar and on the File menu, you can create a new translation file, load a previously-saved file, and save the file you're working on at the moment. A translation file is an XML file which contains strings of Unicode text for all the labels, captions, hints and titles in the program.
Standard edit commands are available when you edit text in the text boxes on the right of the screen.
Press this button to close the translation window and return to the main application window.
The tree control on the left of the screen gives you access to the structural hierarchy of the program. Each node in the tree represents one object in the program, such as a form (= a window), a button or a label. Some objects contain other objects (for instance, forms contain buttons and labels), so the structure is hierarchical. These objects are referred to as items. When you click on a node in the tree, if it has translatable text associated with it, the text will appear in the text boxes on the right. There, you can replace it with a translation, then press OK to store your new text.
Not all items in the program hierarchy have text attached to them. Some will have a title but no hint, and others may have a hint but no title. When translating the interface, you only need to enter translations into the boxes which already contain English text.
The hint property of an item is the text which will appear as a tooltip when your mouse hovers over it. For instance, a button in the program may have a short caption such as OK, but if you put your mouse over it you might see a little popup which says "Accept these changes". That text is the hint.
Menus, buttons and other clickable controls have captions. You will see that some captions have an ampersand (&) character in them; the effect of this is to make the following character into a hot key, which is underlined in the caption. For instance, if the caption is &OK, then the button will have the caption OK, and pressing Alt + O on the keyboard will cause the button to be pressed.
A few items, mainly dialog boxes, will have a title attribute which shows up at the top or in the title bar.
When you have made changes to the text in the text boxes above, you can store your results into the tree structure by pressing OK, or revert to the original text by pressing Cancel.
Note that this does not save your changes to a file on the disk; it merely stores them in memory. To save your changes to disk, use the Save commands on the toolbar or the File menu.
If you're searching for a particular piece of text in an item hint, caption or title, you can type it in the text box above the Find button and click on Find or Find Next to search for it.
Transformer was coded by Martin Holmes from the University of Victoria Humanities Computing and Media Centre, using Borland Delphi 2005. The program was created in close collaboration with Greg Newton, also from UVic's HCMC, wh8ile working on a project to rescue a large amount of old data from a linguistics project, stored in WordPerfect/Lexware format.
The following people contributed interface translations:
The following open-source libraries and controls are used in the project:
Transformer also uses, Microsoft's msvcr70.dll, which is required by the JavaScript Bridge. This is not open source, of course, but it's widely available online, and anyone with an appropriate licence for a Microsoft development tool should be able to distribute it (we have a copy of Visual Studio).
This help file is an XHTML Web page that runs in your browser. If you have a modern, standards-based browser, all its functions should be available; if you have an older browser, or a browser which does not support standards properly, then it may not function so well.
To access the Help file, you can press the F1 key in the application any time; the browser should start up, and the Help file should open, showing the appropriate topic for the area of the application you are using. If there is no particular appropriate topic, it will open at the table of contents.
To search the Help file, you can either look through the Index, or you can use the search capabilities in the browser, by clicking on the Show All button to reveal all the topics, then pressing the appropriate key combination to launch Search in your browser (usually Control + F on Windows).
ANSI (American National Standards Institute) codepages are old, non-Unicode codepages used by Windows to encode text files in a variety of languages, using a single-byte character set consisting of 256 characters. For more information on ANSI codepages, see Wikipedia.
ASCII (American Standard Code for Information Interchange) is a character encoding based on the English alphabet, with no accented characters or diacritics, using seven bits for each character. For more information on ASCII, see Wikipedia.
The term "Batch" in computing usually refers to the performance of an operation or series of operations on more than one file (a "batch" of files). For instance, a search-and-replace operation may be performed in a single document in your word-processor, but you may also be able to perform the same search-and-replace on all the files in a particular folder on your hard drive, in one go.
A byte order mark (BOM) is a sequence of bytes at the beginning of a Unicode text file, used to show the exact type and encoding of the Unicode text in the file. Applications can read the byte order mark to find out how to decode the data in the file. If the BOM is missing, the application may have to guess how best to handle the file. For more information on BOMs, see Wikipedia.
DocBook is an XML markup language designed primarily for creating documentation, manuals and other technical publications. It is an official OASIS standard. You can learn more about DocBook on the DocBook Website.
ECMAScript is the ECMA standard specification for the Web scripting language also known as JavaScript and JScript, which was originally created by Brendan Eich at Netscape. Its most common use is in Web pages, where it is used to manipulate document display and provide interactive functionality for the user. In recent years, however, it has been used in a broader range of applications.
"Open Document Format" is an XML file format used by many office software programs (such as Open Office), to store word-processing, spreadsheet, presentation and other data. It is an open standard developed and maintained by the Organization for the Advancement of Structured Information Standards (OASIS). Version 1.0 of the standard is published as ISO/IEC 26300:2006.
"Preferences" refers to the ability of the user to control aspects of the user interface of the program. Elements such as the fonts used for button captions and edit boxes, toolbar button sizes, and even the language used for user interface captions can be controlled through a Preferences dialog box.
RelaxNG is a schema language for XML. Schema languages are used to create a sort of blueprint for an XML document: a detailed specification of the structure and organization of the document, laying down rules about what elements and attributes are allowed in the document, and where they are allowed to appear. RelaxNG is only one of several schema languages (others include the W3C's XML Schema). RelaxNG is preferred by many for its simplicity and economical syntax. See the RelaxNG Website for more information.
This is the TEI's own self-description from its Website:
The Text Encoding Initiative (TEI) Guidelines are an international and interdisciplinary standard that enables libraries, museums, publishers, and individual scholars to represent a variety of literary and linguistic texts for online research, teaching, and preservation.
The TEI standard is maintained by a Consortium of leading Institutions and Projects worldwide. Information on projects which use the TEI, who is a member, and how to join, can all be found via the links above. Consortium members contribute to its financial stability and elect members to its Council and Board
.
You can learn more at the TEI Website.
P5 is (at the time of writing) the current standard XML format recommended by the TEI. P5 is not a single schema; in fact, it is a set of many modules which can be combined to create a schema or DTD which suits a particular markup project. You can learn more about P5 by reading the TEI Guidelines, and you can generate a P5 schema using the TEI's online schema-creation tool, ROMA.
Tooltips, also called Hints, are helpful messages that pop up in a little square box when you hover the mouse over a component of the program's user interface. They also appear on Web pages, where they are created using the title attribute.
Unicode is a system for encoding every character in every human language, and many other symbols and glyphs, in a single system where each has a unique number. It enables us to create texts in multiple languages without problems of character encoding, and it is independent of system, program, and language. Modern operating systems such as recent versions of Windows (Windows 2000 and XP), OSX, and Linux support Unicode. For more information, see the Unicode consortium page What is Unicode?
UTF-8 is the most commonly-used character encoding for Unicode text files. It is byte-oriented, and the first 128 characters are the same as ASCII characters, and are encoded as single bytes, so it is very efficient when encoding files containing many ASCII characters (such as programming code or Web markup). See the Unicode Consortium FAQ http://www.unicode.org/faq/ for more information.
UTF-16 is a character encoding system for Unicode which is based on 16-bit units. There are two flavours of UTF-16: Big-Endian and Little-Endian. This refers to the sequence of the two eight-bit units (bytes) which make up the 16 bits of each codepoint. Little-Endian is common on Windows, Big-Endian on other platforms. See the Unicode Consortium FAQ http://www.unicode.org/faq/ for more information.
XHTML is the descendant of HTML, the original Web markup language. XHTML combines legacy support for HTML tags with a pure XML structure. See the W3C XHTML specifications for more information.
XML Schema is the W3C's standard schema language. Schema languages are used to create a sort of blueprint for an XML document: a detailed specification of the structure and organization of the document, laying down rules about what elements and attributes are allowed in the document, and where they are allowed to appear. XML Schema is generally thought to be more complicated than other alternatives such as RelaxNG, but there are advantages to using it, among them the fact that there is a standard method of linking an XML document directly to its XML schema using an xsi:schemaLocation attribute in the root node of the document. See the W3C's XML Schema page for more information.