This combo box controls and displays the zoom factor in force for the image display. You can use it to change the zoom, or you can use the mouse wheel to zoom in and out of the image.
X
Cursor position
This shows the position of the cursor on the image, in pixel coordinates.
X
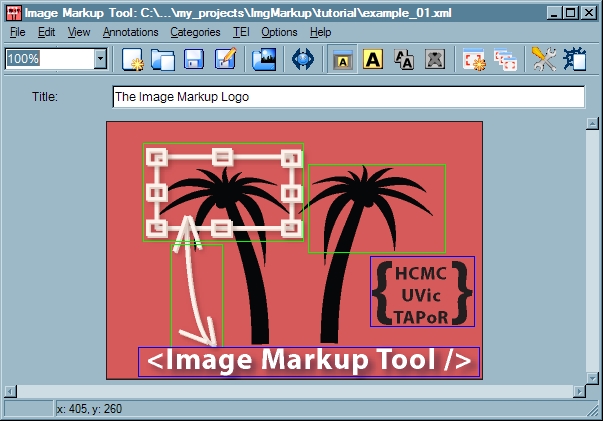
Current image
The image is displayed in the centre of the window. In this picture, you can see five annotation areas displayed as ellipses.
X
File i/o functions
These toolbar buttons, and the related menu items on the File menu, are used to save and load TEI XML files.
X
Image loading
This button allows you to load a new image into the program. You can retain the existing annotation data, and load the new image instead of the existing one, if you wish.
X
Show/Hide the annotation dialog window
This button allows you to show or hide the annotation editing window. It can be useful to hide the window sometimes while you do file operations or edit the teiHeader, then show it again when you want to go back to editing annotations.
X
Add a new annotation
This creates a new annotation area in the centre of the viewport.
X
Clone annotation
This button creates a clone of an existing selected annotation. This can save time if you are creating many similar annotations with only minor variations.
X
Edit teiHeader
This control pops up a simple text editor where you can view and edit the teiHeader markup in your file.
X
Create new category
All annotations are assigned to a category, and this button allows you to create and configure new categories.
X
Category manager
Click on this button to show the Category manager window, where you can create and edit categories, and also change their order.
X
Settings Window
This button shows a dialog box where you can set preferences for the Web View output (such as the preferred maximum width of the image on the Web page), and also set a preference to save the IMT schema file along with your XML file whenever you save it.
X
Create Web View
Click on this button to create an interactive Web page based on your annotation project.
X
Delete annotation
This deletes the selected annotation (after a confirmation message).
X
The Title text box
Type a title for your document in here. The title will be stored in the teiHeader.